A couple of you have asked for a tutorial on how to fold a fabric hexagon yo-yo. Here goes....

Begin with a fabric circle. Keep in mind that the finished hexagon will be approximately one-half of the size of the circle so you will need to gauge it according to your project.

Fold the circle in half. With an iron, press a crease into the center of the fold.

Open the circle, make a quarter turn, fold in half, press a crease into the center of the fold. You should now have 4 equal quadrants.

This photo shows the center creases that have been highlighted with a pen for easier viewing. (You will be using only the creases as your guide).
Fold the outside edge of the circle to the center, press the fold with an iron.

Bring 1st point to the center, press the fold, pin in place.

Bring the 2nd and 3rd points to the center, pressing and pinning in place.

Bring the 4th point to the center, press, pin in place. Take remaining point(should look like a long triangle), bring to center, press but do not pin in place yet.

Open the left side of the long triangle.


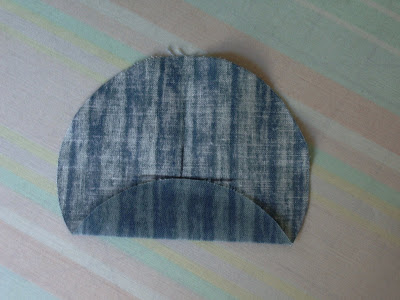
Fold 5th point to center, press, pin in place.

This is what it should look like after the 5th fold is in place.


Take something flat like a bone folder or a letter opener and use it to ease the flap under, forming the 6th fold.

You could stop at this point, hand tack the points in place, and add a decorative button to finish it off or you could move on to the next step...
HOW TO ATTACH THE HEXAGON TO ANOTHER PIECE OF FABRIC WITH HIDDEN STITCHING

Unfold the hexagon to expose the creases. Please note that I have traced the center hexagon creases with a pen so that it can be easily seen by the camera but you will be using just the creased lines as your sewing guide.

Place the circle onto the fabric surface that you want to attach the hexagon to. With needle and thread, take small running stitches just inside the creases.

Refold the hexagon using the previously made creases as your guide. It should fall into place with little effort. With needle and thread, tack down all 6 points. Sew on a decorative button and you're all done. Voila! Fini!

Meet my newest pincushion! I bet you had no idea what I was making, now did you? LOL
Have fun with the tutorial and hexa-yo-yo the night away(that sounds like the latest latin dance move or something)!
Aloha!
**This tutorial is intended for personal use only.**


28 comments:
I love your fabric creations. I do so want to try some of these. I tagged you on my blog because I love coming here to see all your wonderful work. If you don't want to play along that's okay - it's up to you.
What a great tutorial - so clear and well done. Thanks - I was hoping you would post a tutorial as these are so cute.
Great tutorial. I don't know how you come up with something new every day. I marvel at your creativity.
What a fabulous tutorial! I can't wait to try this.
Thank you so so much!!
Fantastic tutorial...well done.
Thank you for your easy to follow instructions. I prefer these to the round yo-yos - I think they're more modern looking perhaps.
thank you for another great tutorial, you've made yet another very pretty pincushion:) Cheers Elly
Thank you so much for posting the tutorial for the hexagon yo-yo's! I just love all your work. I check your blog everyday to see what new stuff you have made. Thank you for the comment about my Aunt Vivian. I agree with you about the left/right hand crochet thing. I plan on doing what you suggested. Can't wait to get started!
Beautiful and unique like all of your pincushions! I can see where that origami practice must have come in handy here.
But one question...how many pincushions do you have anyway?
You have such a wonderful ideas with yo-yo world! Incredible.
I'm new in blog, wrinting you from Spain.
It's very nice to see you tutorials
I love this tutorial. I have made MANY regular Yo-Yo's but have never seen this style. Thank you for giving us the directions.
Wow thats is great idea of doing one and a very good way of explaining
Just found you from Mel's blog....love this tutorial and your blog...I'll be back!!! (Thanks for the tutorial, also.)
What a great tutorial - so clear and well done. never seen this before...Thanks
Julia ♥
Thanks for this tutorial... gorgeous flowers
Great tutorial! Thank You! Now I need directions on how to make the pincushion! I've seen them, but don't remember where the directions were. Can you help?
This tutorial makes me smile. I actually think I could do this if I took my time. I always wanted to make my own yoyos for an art quilt but wasn't sure where to begin. Thank you so much for this information!
That is just so wonderful...you are amazing.
HI Arlette! Thank you for your tutorial I can see so many ways to use these adorable flower in future craft projects too!
Arlette, thank you so much for your very easy to understand. This is my first "real" sewing project and I would like to make either a yoyo quilt or a hexagon one with the hexagons joined together. Can you put anything else besides buttons in the middle of the hexagons?? Thank you so much.. Blessings, Susanna
This is so cute and clever. I'll be linking on Facebook. Thanks for sharing!
I just made 4 of these in greens and plan on making a yo-yo for the center...for St. Patricks Day!
Thank you for the inspiration!
Love your blog!
DEAR Arlette, I've seen a quilt with these hexagons but I have never the idea that it begins with a circle.
Thank you for teaching me on the web. I would follow your blog because I love the old hexagons. Rosely from São Carlos, SP, Brasil.
Thanks for this amazing tutorial!!!
Super clever! A quilt made from these would look stunning.
Absolutely FANtastic! Great tutorial and pictures! Can't wait to try this.
Muito legal esse jeito de fazer, eu conhecia de outra maneira, me encantei. Parabéns! Tem muita coisa bonita por aqui já estou te seguindo. Beijos.
Just tried this, and i love it! thank you for the tutorial!
Post a Comment