Friday, July 30, 2010

A Bit of Everything

Thank you for participating in my giveaway. Five winners will be announced on Sunday. Thank you for playing along and for offering your organizing ideas. It was a very interesting and entertaining read. It seems that many of us struggle with organization. For me, it is an ongoing process. What works for me today may not work for me tomorrow.

It is amazing what you find when you begin organizing. I must have thought that I needed more colored pencils. Why? I don't know.


I am kind of in between projects at the moment and still unsure what to work on next. I actually feel a bit scattered even though I am a lot more organized now. When I feel this way, I always opt for something familiar.

My motto: When you don't know what else to make, make hexagons.


So, hexagons it will be. Maybe more Hexagon Flower Ornaments are in order.


After all, I have 6 drawers of scrap fabric sitting around waiting to be made into something.


I'll leave you with this. We sometimes have the most amazing Hawaiian sunsets. This was snapped from my patio several evenings ago.


Have a wonderful weekend, everyone!

Aloha!

Tuesday, July 27, 2010

Organizing Again

I am currently in the process of reorganizing my craft supplies. Many items are not being used simply because I do not have easy access to them.

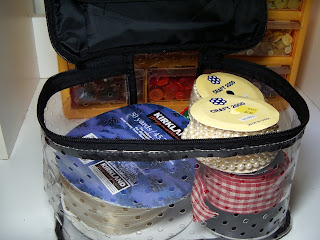
I have an enormous amount of ribbon on spools. We all know how bulky that can be.

I also have glass jars filled with loose ribbon yardage. Although it is pretty to look at, it feels very unorganized and unruly to me.


I emptied these plastic ribbon containers of ribbon spools simply because they didn't work for me. They are too bulky, hold too little ribbon, and just became a huge waste of precious space.


Then there is this bag with the gazillion holes in it. It held a huge tangle of ribbon. I'm going to retire it for the time being and just use it to hold some wider ribbon spools.


After much thought, I decided to go with a series of three drawer plastic stackable bins. For now, this seems to be the most practical for my current needs. I resisted this type of storage for a long time because it leaves creases in the ribbon from being wound around spools. At this point, I'm not going to worry about it. Worse case scenario is that it will need to be ironed. I think I can deal with that being that I seldom use ribbon anyway.


Who would have thought that winding ribbon onto spools could be so time consuming. Another several days and I should have it under control.

Soooo.....since I am not creating anything at this time except a big mess, it looks like it would be the perfect opportunity to hold a quick little giveaway.

How would you like to win a Floor Buddy, a Hawaiian style foot mop great for wiping up small spills? You wear it on your foot like a slipper. No bending involved. Yep, lazy, island style cleaning at it's best. Hehehehe!


A traditional flower lei.


Swaying coconut tree.


Mouth watering pineapple.


To be eligible to win a Floor Buddy, please tell me how you organize your crafting supplies. Just pick one thing that works well for you and tell me about it in the comment section under this post.

This giveaway will end on Friday, July 30, 2010 at 6:00pm EST. Five(5) winners will be chosen by random number generator on Sunday, August 1, 2010 and packages will be mailed on Monday, August 2, 2010. Each winner will receive one(1) Floor Buddy, design chosen at random.

Good luck to all of you. It's back to the salt mines for me.

Aloha!

Friday, July 16, 2010

Sweet Sugarplums--A Tutorial

A sweet confectionery reminiscent of bygone days. Old fashioned morsels of goodness that conjure up wonderful childhood Christmas memories for me. Of course, in my youth, peppermint was the dominant flavor and quite possibly the only flavoring used for these. Nowadays, they are made in many flavors but my favorite continues to be the original peppermint. One glance at these and I relive my childhood memories all over again.


To create these sugarplums, you will need 2 fabrics (white and a contrasting color), bias tape maker, fabric glue, scissors, an iron, a pressing surface, a needle, and coordinating thread.

*To make the candy wrapper, cut two 2" x 2-1/2" fabric pieces.
*Place the first fabric rectangle onto an ironing surface, right side facing down.
*Fold up 1/4" from both 2" ends. You will end up with a 2" square piece.
*Bring both raw edges to the center and press flat.
*Bring the 1/4" folded ends together. Press flat.
*With needle and thread, take running stitches at the 1/4" folded edge. Pull thread to gather and knot off. Try to hide your knots within the layers.
*Repeat this with the remaining fabric piece.


For this project, I used a bias tape maker that makes 3/4" single fold bias tape.


Fold the bias tape in half to create quarter fold bias tape that measures 3/8" in width. Press flat. You will need approximately 12" of each color to make the candy piece depending on how tight you roll it and the thickness of your fabric.


Place two bias tape pieces together and begin to roll it into a spiral pattern, adding fabric glue as you go around. The finished candy piece measures approximately 1" in diameter.


Glue the candy wrapper pieces to both sides of the candy spiral. I began by gluing one wrapper piece over the raw edge left from wrapping the candy spiral and then glued the other to the opposite end. This hides the raw edge nicely.


Spearmint flavored sugarplums.


Strawberry flavored sugarplums.


Refreshing peppermint sugarplums. I can almost taste it now.


These sugarplums would make cute embellishments on a Christmas-themed mini scrapbook, picture frame, or wreath. Or, just use it as decorations for your Christmas tree.


A garland would be really sweet with the addition of fabric yo-yo's.


These sugarplums are so much fun to make and so sweet to look at. Enjoy the tutorial!

Have a fantastic weekend.

Aloha!

Friday, July 9, 2010

Las Vegas Themed Party Favors

We will be celebrating my dad's 80th birthday this weekend so I put together some quick and easy party favors for the occasion. The only vacation spot that my dad has ever been to (like a gazillion times) is Las Vegas so I thought that the favors should reflect his favorite place on earth.

The Hershey's Nuggets look like gold bullion to me so I thought that it would be appropriate for the occasion. I had an unused deck of playing cards laying around so I decided to use it to create a vessel to hold the "gold".


I used a rubber stamp to make tags and used a scallop paper punch to punch each of them out.


Double sided extra sticky tape was used to anchor the candy to the card and to each other. Holes were punched on both ends of the cards and a thin ribbon was threaded through to tie it together in a neat little bundle.


I absolutely love these simple Las Vegas style party favors and the best part of all is that they took under 2 hours to make.


Wishing you a fabulous weekend! Viva Las Vegas!

Aloha!

Wednesday, July 7, 2010

T-Shirt Yarn Posies

A braided rug posie made from braiding 3 strands of t-shirt yarn together. I glued it onto a cardboard base in a spiral pattern and topped it off with a button. The leaves are made from excess t-shirt parts (sleeves and upper body) that were fused together using Heat 'n Bond before cutting leaf shapes from it. The leaves were then topped stitched by hand.

The other, a single strand of t-shirt yarn glued to a cardboard base in a spiral pattern. It was also topped with a button and 2 leaves made from excess t-shirt parts. The leaves were then topped stitched by sewing machine.


Braiding t-shirt yarn is fun to do. All along, I kept thinking of what a beautiful and durable rug or basket this would make. If you are interest in making t-shirt yarn, please see my tutorial here.


Something slightly different...4-ply worsted yarn and fluffy eyelash yarn held together while being crocheted with a size I hook into a loose chain before being glued into a spiral pattern onto a cardboard base.


For this flower, I chose some vintage velvet leaves for a slightly dressier look. I absolutely adore it.


Have a fabulous, flower-filled day!

Aloha!

Friday, July 2, 2010

Finale--Paper Flower Wreath

I cannot tell you how happy I am that this is the last entry of the paper flower wreath tutorial. I was slowly losing enthusiasm as the week went by. I must say, although long and dragged out, I am very pleased with the way it all came together.


I used a doubled piece of floral wire to form a hanger for the wreath. Two small holes were made in the wreath base with the point of a scissors and the wire was fed through and twisted off in the front of the wreath. The flowers will cover the unsightliness of the wire.


This is what the wire on the back of the wreath looks like. I gave it a couple of twists to form a loop that will be used for hanging.


Because the rosettes are pretty flat, I decided to use paper spacers to slightly lift it from the wreath base. I cut strips of paper measuring 3/8" x 17" and rolled each of them tightly, adding glue as I went along. I glued a paper circle to the backside of each rosette before gluing on the spacer.


Begin by arranging the anchor flowers evenly on the wreath base. Apply hot glue to the base of each spacer and glue the rosettes in place.


Fill in with both medium and filler flowers. Hot glue in place.


The combination of colors and textures of the flowers worked out well for this wreath.


It was fun to make but I am glad that it is finally finished.


Please leave me a message in the comment section of this post if you made this wreath. I would love to link.

Have a wonderful weekend, everyone. Happy Fourth!

Aloha!