I would like to share my method of making a facial tissue pocket. This tutorial will also show you how to create "faux" seam binding at the opening of the tissue pocket. It looks almost like the real thing, I promise, only way easier.
There are very simple pattern pieces involved. It requires as little as two pattern pieces, three if you'd like to create a yo-yo embellishment.
Please do not let the overwhelming amount of photos discourage you from attempting this project. I wanted to provide complete details in case a sewing novice would like to try this. I would estimate that this project can be put together in approximately 20-30 minutes from beginning to end, depending on your sewing expertise.
Let's begin.
You will need two coordinating or contrasting fabrics to create this tissue pocket.
For the outside of your tissue pocket:
Cut a piece of fabric measuring 6-1/4" x 6-1/2". Because both of the pattern pieces are similar in size, mark the 6-1/4" side either by cutting a couple of small notches into the edge or by marking it with a pen. These markings will come in handy when attaching this piece to the lining.
For the lining:
Cut a piece of fabric measuring 6-1/4" x 7-1/2", notching or marking the 6-1/4" edge.
If you'd like to embellish your tissue pocket with a yo-yo, cut a 2" circle from the lining fabric.

Here are the fabrics that I have chosen. Each piece has been cut accordingly and notched on the 6-1/4" edge. I have also included a 2" fabric circle as I will be embellishing my tissue pocket with a yo-yo.

With right sides together, pin the outside fabric to the lining on the 6-1/4" edge. Be sure that you have placed the correct edges together by referring back to the notches or marks that you previously made.
Sew a 1/4" seam.

Pin opposite side in the same manner.

Sew a 1/4" seam.

With an iron, press both seams open.

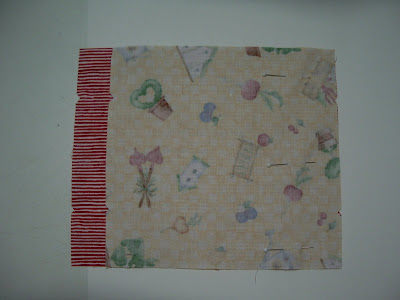
Turn right side out. With lining side facing down, center the outside panel so that it is equally bordered by the lining on both sides; press flat with an iron.

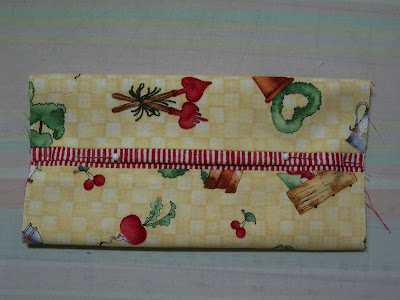
With the lining side facing up, bring one side of the finished seam up toward the center. Pin in place approx. 1/8" over the center mark.

Fold the other side to the center, also overlapping 1/8" over the center mark.
We will be making a French Seam to encase all raw edges to keep them from fraying.
Sew a 1/4" seam from the raw edge on both sides.

Trim seams on both sides very close to the sewn edge.

Turn inside out (lining will now be on the outside)

Sew 1/4" seam on both sides.

This is what your tissue pocket will look like with both sides sewn.

Turn right side out.

I am sure that most of you know how to make a yo-yo so I am not going to demonstrate it here. Embellish your Fancy Facial Tissue Pocket with a yo-yo and a button and fill it with your favorite facial tissue.

Enjoy!


26 comments:
Oh, my God!! This is the tutorial I've searched on my computer but haven't found... And here it is. Thanks a lot!!!!! Can you sew my thoughts?:)))
Have a really nice weekend - hugs from Hungary, Europe!
Lettie, what wonderful tutorial! This is how I make mine, except I have never thought to use the french seam. Thanks for sharing.
Thank you Lettie! I have made these but there was an unfinished seam left, which I didn't care for. Now that problem is solved. Another clever idea..TTFN..Lilly
Thanks for the tute! These will make great gifts.
What a neat way to put it together.
That's a great tutorial Lettie. I always love your fabric choices. You have a very good eye for putting things together. Thanks for sharing.
Thanks for the great tutorial...you're the best!!
I have seen several tutorials on that but I really like yours alot.
Thanks!!
Thanks for another great tutorial!
E' fantastico!!! Grazie!!!
Wow, Thanks for the great tutorial. I've always wondered how to make those. 8)
Lettie,
Thanks for the tutorial - you make the prettiest things, you know it?
I love your tutorials - and the cute things you make.
How nice of you to show us how you make these.I knew this tissue holders and even have one but never knew exactly how to make one.
I have a different one that I make.One that opens like a book.
Thanks for sharing
Thanks for sharing. I am definitely going to make some of these for friends.
Thanks for this tute too! I'm off to make some of these up for family members for Easter!!!!!!!!!!! YIPPEE!
i tuoi tutorial sono bellissimi , vorrei provare a farne uno ma non riesco a convertire le misure in centimetri sai per caso come posso fare ? ciao hamalsi@hotmail.com
grazie tante per la tua mail, spero di sentirti presto ti lascio l'indirizzo del mio blog www.twinscreatio.splinder.com io ti visiterò spesso . Grazie
What a wonderful sharing blog! I love all of your creations and how nice of you to share! God Bless! Kerrie
Thank you Lettie :) I received something similar as a gift and thought it was wonderful but also wondered how it was made.... thank you for your fabulous tutorial... also showing the French seam how to. I think I will use this for a bag I'm making :)) It will save binding the seams after :) Hugs Elly
Grazie per questo utilissimo tutorial e per le cuciture nascoste!
Hi Lettie!
Through a rond about way, I have found your blog, and I must say you are very talented!!!
I love these tissue holders, and thanks for the tutorial. Will be following you...
Elzaan
www.huisvlyt.blogspot.com
Thank you for such a great tutorial. It produces such a neat finished product. I am making these to share with some friends.
Thank you! Thank you! THANK YOU! Great tutorial. Can't wait to try it!!!!!
I love the tissue holder you made that was 1/2 red polka dots and 1/2 beige with a cute little flower. Is it possible to get the pattern. If so, I'm at Jacquelyn5108@yahoo.com
Thank you
Finally a really professional way to sew a tissue holder. Easy enough, but what a difference! Thank you, Lilly. You are so talented and dear to share this with us.
Post a Comment