About 5 years ago, I prepared a tutorial with pictures showing how to create yarn from cotton t-shirts. Wouldn't you know it, when I looked for it this morning to post to my blog, it was nowhere to be found. I want to apologize in advance for the quality of this new tutorial. It was done early this morning when the lighting was poor. I also found it difficult to shoot several of the steps because what I really needed were 3 hands instead of 2.
T-shirt yarn is a very durable yarn. It is outstanding for making rugs and trivets in either crochet or knit. You will need to use a larger crochet hook or knitting needle than you normally would to comfortably be able to deal with this yarn. I have tried it in many widths, from 1/2-inch strips which produced a thinner, more flexible yarn to 1-1/2-inch strips which produced a chunky, stiff yarn. Today's yarn was made using 1-1/4-inch strips which was perfect for the project that I had in mind.
Okay, I will start off by saying that I have had these t-shirts sitting around my house for over 3 months just taking up space. And no, before you ask, I did not steal my hubby's favorite t-shirts! (foa da Hawaii peeps, no, I neva kakaroach um,okay...LOL) The intent was to donate these shirts to charity. Unfortunately, I have been really lazy and never got around to doing that. So instead, I've decided to turn them into t-shirt yarn for future projects just to get them out of the way.
Luckily the t-shirts that I have to work with are in a good array of colors so eventually it will give me a nice variety to work with.
**Please note that only the unprinted, plain portions of the t-shirts are suitable to make into yarn. The ink and printed images are stiff and will not allow the yarn to curl under and form a smooth tube.

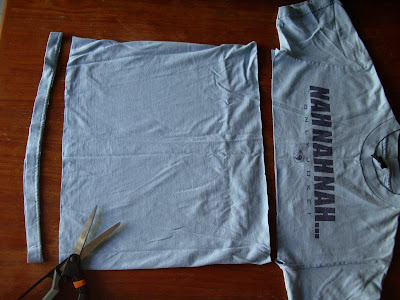
Start by placing a t-shirt onto a flat work surface. Straighten the t-shirt so that the hemmed edge lines up neatly.

Using a sharp scissor or rotary cutter and ruler, cut away the bottom hem. Also remove the upper portion of the t-shirt with a straight cut right at the under arm. You will be left with a tube with the left and right sides open.
Take the bottom of the tube (closed end) and fold it upward, leaving a 1-inch margin at the top.

Fold it once more, making sure that you keep the 1-inch margin at the top.

Start cutting your t-shirt into strips, leaving the upper 1-inch margin intact. If you find that it is too bulky to cut through all of the layers at once, only fold it once instead of twice and just cut longer strips. You can decide how wide you would like your strips to be. I have cut strips as small as 1/2-inch and as large as 1-1/2-inches.

This is what it should look like after you've finished cutting the strips.

Unfold the strips. Notice that you will still have the 1-inch uncut margin at the top.

The easiest way to do this step is to run your arm between the two layers of t-shirt with the uncut margin resting on top of your arm. The statement that I made about needing 3 hands comes in here. I couldn't have it draped over one arm and at the same time cut it as I was taking the picture. Impossible.

So, in order to be able to photograph and cut it at the same time, I placed a round plastic jar inside the t-shirt in place of my arm.

Take your scissor and make a diagonal cut from the top of the first slit to the bottom of the second slit on the opposite side.

This is what it should look like after the first cut...

Keep cutting diagonally until you've reached the end. Please note: You will need to go back to the beginning where you made your first cut. You will notice that it will still be joined in a circle. Make a small diagonal cut to open the circle. I find it easier to do this in the end as it can make things confusing trying to figure it out in the beginning.
You will end up with one continuous piece like this:

To turn this into yarn, take short sections of approximately 1 to 2 feet betwen both hands and give it a good tug. It should curl under forming a tube. Repeat throughout. This should take you just a couple of minutes to do. Easy, peasy and fun too.

This is what your yarn will look like after you have completed the above step.

Here is a ball of t-shirt yarn just aching to be turned into something fabulous.

Today I have chosen a quick and easy crochet project as an example of what something made from this yarn will look like. Upon completion, this will become a trivet to go under hot pots and pans.

Now go ahead and have fun with t-shirt yarn. And please don't limit yourself to just trivets and rugs. T-shirt yarn can be made into a whole lot more.

How about knitting a cute tote from your new-found yarn.
Aloha,
Lettie
**This tutorial is intended for personal use only.**
Lettie, you are rockin' COOL! Tshirt yarn?!? (LOL, now I can imagine how you felt when you read about the communion scraps) Your tutorial was very easy to follow and oh! is that an old tshirt of my husband's over there? Waiting to be turned into a rag? All I need to is purchase a crochet hook and I'll be set. Thanks for a great post (and yes..some of us locals like to kakaroach things).
ReplyDeleteAnother thing, from the angle of the first cut it would seem that you are left-handed. I'm a southpaw myself!
ReplyDeleteThank you so much for this. I had found a tutorial previously (maybe it was yours? The tee was yellow...) and I can't find it now. Is it okay to post this tutorial on my purse blog? The current challenge on that blog is to make a bag from one or more tees. I try to give as many different ideas as possible, and crocheting is a fun option.
ReplyDeletehttp://iwannanewbag.blogspot.com
Here's my blog post. Thank you for a great tutorial.
ReplyDeleteFabulous tutorial and a wonderful recycling craft idea. I did something similar with some old denim shirts but to crochet with them was a bit hard on my hands. I'm sure a tee shirt would be much easier. Thanks for the great idea.
ReplyDeleteThis is just brilliant!! Thank you Lettie, Cheers,Elly
ReplyDeleteHad to leave a comment after reading this wonderful tutorial.
ReplyDeleteBrilliant!!fantabulous!! terrific!!
Deepa
This is GREAT! WOW!
ReplyDeleteI found you through Retro Housewife and love this easy fabulous way of reusing t-shirts. Thanks!
This is awesome. I found you through Retro Housewife. I am so NOT crafty but I am def. going to give this a try. FUN!
ReplyDeleteWow!!I have been trying to find out how to use scraps and tees to crochet a rug...Here it is October 2008 and I only just found your great Tee Tutorial thru the Quilting101 group at Quiltropolis!!This is a double blessing. I have been reluctant to cut up the Tees that I have been saving for making a t-shirt quilt until I found the directions to prep the leftovers for crocheting rag rugs.Thanks to you,I can now do so. I am going back to check out the rest of your blog - hopefully you have the crochet pattern that you use for your coasters listed.
ReplyDeleteI love your yo yo creations also!!!
I love this idea. Thank you! How do you join any additional balls of yarn? I know I could experiment, but thought I'd ask the expert.
ReplyDeleteThank you!!!
Thank you for your tutorial on t-shirt yarn. I've been wanting to make a rug. We have so many old t-shirts. sus
ReplyDeleteAfter saving old clothes (jeans ect.) It was great to read a concise tutorial for something else I normally save for rags but would be better used for yarn. BTW...If people don't knit or crochet(like me) They can use a Knifty Knitter to use the yarn. Lots of fun for the grand kids. Cut wider you could use the thicker resulting yarn for making pot holders on an old pot holder loom...I wonder which box mine are stored in. Thanks so much, You are ingenious.
ReplyDeleteThank you for this brilliant idea!!!!! I've got loads of old shirt taking up space and now I can turn them into yarn!
ReplyDeleteOMG...what an awesome idea!!! Good thing I'm a major packrat...I have plenty of old t-shirts to get started. Thank you so much for sharing!!!
ReplyDeletehi , thanks for sharing.. i love your ideas......
ReplyDeletejust found your through surfing. I am certainly enjoying the heckfire shoot out of your blog.
ReplyDeletethank you for sharing your talent.
This is wonderful! Thank you so much! I can't wait to try it.
ReplyDeleteWhat a great tutorial! I can't wait to try to make some "yarn"
ReplyDeleteLove your blog and your other tutorials too. Thank so much for sharing.
This is wonderful! Thank you so much!
ReplyDeletemy blog: Seo Tips & Seo Blog
Oh.my.goodness! What a fantastic idea. But, alas, JUST yesterday I put about 10 t-shirts in the goodwill bin. Blast!
ReplyDeleteThis is a fantastic tutorial - thanks! The pictures and description are really clear.
ReplyDeleteHi Lettie, this is my first visit.. I found you through Jackie at CVQuiltworks. This is such a neat idea.. and I love the tutorial. May I add it to my sidebar as a link to fun tutorials?
ReplyDeleteoooooh! I like this! I have heard rumors of people going to thrift stores and getting bags full of t-shirts for only a few cents each, but I don't think I will have such luck at my local shop...
ReplyDeleteThanks for the tutorial!
grace :)
Thanks for the awesome tutorial!!
ReplyDeleteThank you for share, Lettie.
ReplyDeleteNow I know what to do with a lot of t-shirts.
Arlette: I was just introduced to this technique via a link from Craft-Gossip. I am now sitting here knitting a t-shirt rug and I will post the finished product on my blog, probably next week. This is a great idea and I am so happy you shared it with us. Thank you so very much!
ReplyDeletewhat a great idea!!! thank you for it, I liket it very much, I must to try:o))))
ReplyDeleteTHIS.
ReplyDeleteIS.
WICKED.
I've never seen something so neat...i'm totally doing this!! :D Thanks so much for the fantastic tutorial!!
You rock. tis it the best t-shirt yarn tutorial I have every seen!!
ReplyDeleteThank you!
Oh my gosh! this is so clever. I must admit I have never come across this. I will be following your blog.
ReplyDeleteAwesome tutorial! I just tried it as a test for Christmas gifts. Love this!
ReplyDeleteThanks for the great tutorial! I just went through my honey's closet full of tshirts and pared it down to the ones he is currently wearing so I have a lot of available material. Can't wait to get started on this project.
ReplyDeleteI love your blog & this tutorial.. Can u help me, i really need your advise on the crochet hook. What size should I buy/use for 1/2 inch t-shirt yarn? tq.
ReplyDeleteYour tutorial was so easy to follow. I made my first t-shirt yarn yesterday and I was amazed at how great it came out. Thank you so much for posting this! My daughter's class is learning about recycling and they are bringing in old shirts for us to make little scrubbies to use in the classroom.
ReplyDeleteThanks,harika,wonderfullll......
ReplyDeleteI DID IT! Ohh I am so grateful to you for posting this tutorial. I was asked to lead a Girl Scout event on recycling and this will be a hit! My family watched in wonder on how it would turn out....I really wowed them.
ReplyDeleteI just love your ideas!! I was just thinking I need some new chair pads, and after reading this, I think they will be out of my recycled yarn. I use woven fabrics like old sheets, shower curtains etc. I have balls of it. I'm pulling out my large crochet hook and getting started!
ReplyDeleteThanks for the tutorial! I have tried this and it works great, except that the yarn tends to 'shed' little bits of thread everywhere. Do you have this problem and if so, do you know anything i can do about it?
ReplyDeleteThanks again!
This is great! Thank you SO much, your explanations and photos really help. I'm dying to get to the thrift store now! ;o)
ReplyDeleteThis is such a great idea! I just found this today and am so, so, so, so excited about it and can't wait to try it. Thanks so much for sharing it!
ReplyDeleteI have one question: why can't you use a t-shirt with side seams? Is it just because they look ugly as they mix with the yarn or does it actually stop the process from working eg. the fabric won't roll?
Thanks again
Caz from Never Knew
Absolutely fantastic. I like your ideas and the fotos.
ReplyDeleteThank you.
Great tutorial! Thanks for sharing, Lettie.
ReplyDeleteBarb in Syracuse
Fabulous tutorial and a wonderful recycling craft idea. I did something similar with some old denim shirts but to crochet with them was a bit hard on my hands. I'm sure a tee shirt would be much easier. Thanks for the great idea.
ReplyDeletecheap wholesale T-shirts
thank you, arlette. i'm making face cloths to use them with my handmade soap!
ReplyDeletequerida foi muito bom ler seu blog eu tbm ganho muitas camisetas e estao furadinhas e nao sabia o que fazer agora ja sei rsrsrsrsrs obrigada pelo seu pap sou brasileira moro em sao paulo e gosto muito de artesanato com tecidos aproveito tudo muitos bjo e fique com DEUS.
ReplyDeleteThat's so nice of you to share this elaborate tutorial to make the yarn out of old t-shirt...i need to try it soon..thank you so much
ReplyDeleteMahalo for the tutorial. Perfect for all those old shirts I've packratted away.
ReplyDeleteLOVE this! And who doesn't have a gazillion t-shirts? Thank you.
ReplyDeleteThis is awesome! It's as if you were reading my mind! I had a loop from cutting off the bottom of a T that was used to make a tote and I was thinking that it could be linked with others and worked into something plarn style but that would have been much more bulky than your method.
ReplyDeleteQuick question! I cut up one of my daughters' tshirts, and when I pull, the strand does not turn into a tube. Is it too thin? (I cut about 1/2"-1"?) Does the shirt need to be a bit stretchy? Have you ever encountered this? lol :P
ReplyDeleteLettie, I am so glad I came across your blog! I can't wait to make this t-shirt yarn. I think I will start tonight!
ReplyDeletegreat!
ReplyDeletethanks!
c@ from Chile
Love this tutorial, thanks for sharing this!
ReplyDeleteHow do you determine how wide to make your top margin during the first fold?
ReplyDeleteThis is soooo cool and your tutorial was very simple to follow. Thanks for sharing.
ReplyDeleteblessings,
Toni
Just made my first two balls of yarn, gosh that felt good! going to go find some more old t-shirts. Thanks a bunch
ReplyDeleteLindo,lindo,excelente idéio.
ReplyDeleteThanks you soooooo much, can't wait to try it :)
ReplyDeleteI am thinking about trying this with the knittting looms that I have...since they take bulky yarns just fine, I am guessing they will work great too! Thanks for the fun ideas!
ReplyDeleteI have a TON of T-shirts that I did not know what to do with.....I mean who wants to wear all the T-shirts from places that I have worked???? This is going to be perfect....thanks so much. I will now have a lot more room in my closet!!!! Going to do an afghan for my guest bedroom...going to try T-shirt granny squares...we'll see.
ReplyDeletegrazie mille per aver spiegato cosi bene a creare la fettuccia..io la lavoro con ottimi risultati...ora ancora di piu..
ReplyDeleteThanks so much for this easily understood tut! So easy, instant gratification!!!
ReplyDeleteXoXoXo
Joy
Oooo, I like make da kine. West Side Wahini
ReplyDeleteThanks for the tutorial. I cant tell you how many T-shirts I destroyed trying to get this just right before I found your blog and easy instructions. I have just posted a free pattern for a handbag I made from T-shirts. I linked to your blog how I made the "yarn".
ReplyDeleteThanks again!
Here's the post:
http://sophisticatestyle.blogspot.com/2011/04/upcycled-t-shirt-handbag-free-pattern.html
I'm going right now to look through my tshirts to decide which ones I will make into yarn! I am so excited about this! I have been trying to think of a unique gift for a friend. I now know what her gift will be made from, even if I haven't decided what the item will be, yet. Thanks! I'm so glad I found this blog!
ReplyDeleteI am so excited to try this! I also am going to gather some old jeans to recycle them too! Such great ideas! Would you mind if I printed these instructions out? It will be easier for me to follow while cutting the t-shirts and jeans than if I have to keep running back to the computer. Thank you so much for being so 'green' and encouraging and teaching me new ways to be so! Lynn
ReplyDeleteI Googled how to make t-shirt yarn and got to your page. How fortuitous -- this was super helpful.
ReplyDeleteTHANK YOU SO MUCH!
I would like to make this the Tutorial of the Day on my Blog, The Crafty Artisan.
ReplyDeletehttp://wiserunning.com/blog/
We would post a photo or two along with a link sending my readers to your web site.
Happy Crafting!
Awesome, and I love the look of your basket!
ReplyDeleteHave you tried using jersey sheets? I have one with a run near the bottom I'd like to upcycle.
Ilove it.
ReplyDeleteThanks for sharing.
Nina
Is it at all possible that I could have a printable copy of this tutorial? I would prefer to have a printed copy in front of me to look at while I make t-shirt yarn than to have to put the laptop on the table and scroll down to the next step. Thanks, Wendy
ReplyDeleteI absolutely love the blog, especially all the recycling ideas. Your tutorial here taught me how to use t-shirt yarn better than any others I found. I recently wrote an article about recycling with crafts and how to use household items as yarn, and linked to your tutorial.
ReplyDeletehttp://www.associatedcontent.com/article/8212955/household_items_you_can_use_as_yarn.html?cat=7
Keep up the good work!
Love this! I had just come across an idea to make dishclothes out of tshirt yarn - googled it and your blog came up. Great tutorial and can't wait to turn some of the old Ts in the house into something useful!
ReplyDeleteThanks again!
Leigh Ann
Hey there! I would really love to feature a link to this post on my blog and wanted to know if I could snag a couple of the pictures to link with? My blog is http://crochetlunch.tumblr.com. Thanks!
ReplyDeleteAmazing tutorial! Thanks for sharing. I am resharing this post link on my buzz. Keep up the good work. God bless!
ReplyDeletelovelyyyyy....Thank you very much for sharing this post.
ReplyDeleteE' fantastico!! Sei eccezionale, questo tutorial mi sarà di grande aiuto, non vedo l'ora di metterlo in pratica. Grazie
ReplyDeletePat
Oh you rock! I've been looking for a t-shirt yarn tutorial and this is the best! Thank you!
ReplyDeletedo you have tutorial for the crocheted trivet featured in this post? I am new to crocheting & am looking for a pattern like the one you're doing here with the t-shirt yarn. Thanks! this is a great post!
ReplyDeleteHi - I would like to place the link to your t-shirt yarn tutorial on my new website that will be launched after the first of the year. I don't see an email address so I can reach you directly. If you have no objections, I will use your banner picture and attach your tutorial link to it directing traffic to your blog.
ReplyDeleteThe website will be including tutorial links to the various website/blogs offering how to make the various types of recycled yarn (e.g. plarn, tarn, harn and blue jean yarn) together with pattern links to various website/blogs made with recycled yarn.
Please let me know if this is okay. You can email me at plastiquerecreations@yahoo.com. I
I love this!!! Thank you for this tutorial!
ReplyDeleteThank you for the wonderful tutorial! I can't wait to give this a try!
ReplyDeleteThsnk you for such a great tutorial. I understand this method for the first time and plan to use it with plastic bags for plarn. Thank you again.
ReplyDeleteKick butt! Just a thing I noticed. I went a head and cut things up and pulled to form the 'yarn' but I think I pulled things backwards cause I ended up with the seams of the inside of the shirt on the 'outside' of the yarn. So I think you need to pay attention to what way your pulling the shirt to make the yarn! Gonna retry with a new shirt, w00t!
ReplyDeleteThank you for this! It was so helpful.
ReplyDeleteMuchas gracias, las fotos ayudan a las que no controlamos el inglés. Me será de mucha ayuda.
ReplyDeleteUn abrazo. Pilar.
Thanks for the post! This is awesome! I am just learning how to crochet, and I was wondering what Trivet pattern you used? Looks different than the other patterns I have seen. Thanks! :)
ReplyDeleteThis is a great post!! I just saw something made of thirt yarn and I was wondering whether you tie the pieces together or what... :) And this post explained it all!! Well well, now all I need to do is find some old tshirt...hmmm..
ReplyDelete:)
I LOVE this! I am currently working on making the tshirt yarn. Just a quick note.. I cut the sleeves into tarn (tshirt yarn) and use for small projects like small coasters to go under your drinking glasses. This way I use more of the tshirt material. :-) LOVE it!!
ReplyDeletewonderful! Thank you for sharing your tutorial!
ReplyDeleteHi Lettie! All of your projects are very artistic and lovely! Thank you so much for sharing. I tried to copy and paste the T-shirt yarn tutorial into a Word document so that I could remember how to do it when I found time, but get the pop-up that I need your permission to do so. May I please have your permission? TIA Vickie
ReplyDeleteSeriously you are simple creative. I have few tshirt which are now useless so I can make a try. Thanks for the lovely post.
ReplyDeleteAwesome :-) I was looking for a way to keep our cat happy during the periods my hubby is away (he's with the Dutch navy). She always goes nuts over his shirts and sweaters, so now I'm crocheting a little kittybasket using his old shirts, thanks to you.
ReplyDeleteThanks for the great tutorial!
Ciao from the Netherlands
Thank you so much for this - I had a hard time finding a tutorial with a clear pic of the final cutting phase, but yours is perfect :)
ReplyDelete